A WhatsApp bot is a valuable addition that will increase your business’s groth potential without increasing costs. Learn how to set one up.
5 de May de 2021 | por: Nahuel Gomez
min de leitura
A WhatsApp bot is a valuable addition that can increase your business’s growth potential without increasing costs. Learn how to create your own WhatsApp bot in the following article.
What is a WhatsApp bot?
A WhatsApp bot is automated software that allows you to respond to clients automatically via its integration with the WhatsApp Business API. These bots can work using a menu (showing options for users to choose from) or be powered by artificial intelligence.
Using a conversational bot with WhatsApp exponentially increases your teams’ response capacity. It’s much easier than you might think, as we’ll explain in the section below.
Activate your WhatsApp Business Account to get started
The first step is creating and activating a WhatsApp Business account with a dedicated number.
You must get your Business account approved to use the WhatsApp API. This requires you to verify your Facebook business account. You must complete this form from Facebook to apply for access.
Or you can leave that until you get to step three: get Zenvia Conversion, a software solution that provide chatbot implementation and is an official WhatsApp partner. This step is vital, as WhatsApp only aproves a limited number of providers to integrate chatbots with their app.
Steps for creating a bot for WhatsApp using Zenvia Conversion
Once you have logged in to the Zenvia Conversion platform, follow these simple steps to create your own bot for your WhatsApp line:
Select the WhatsApp line you want to create the bot for.
Select the tab that says “Zenvia Conversion bot.”
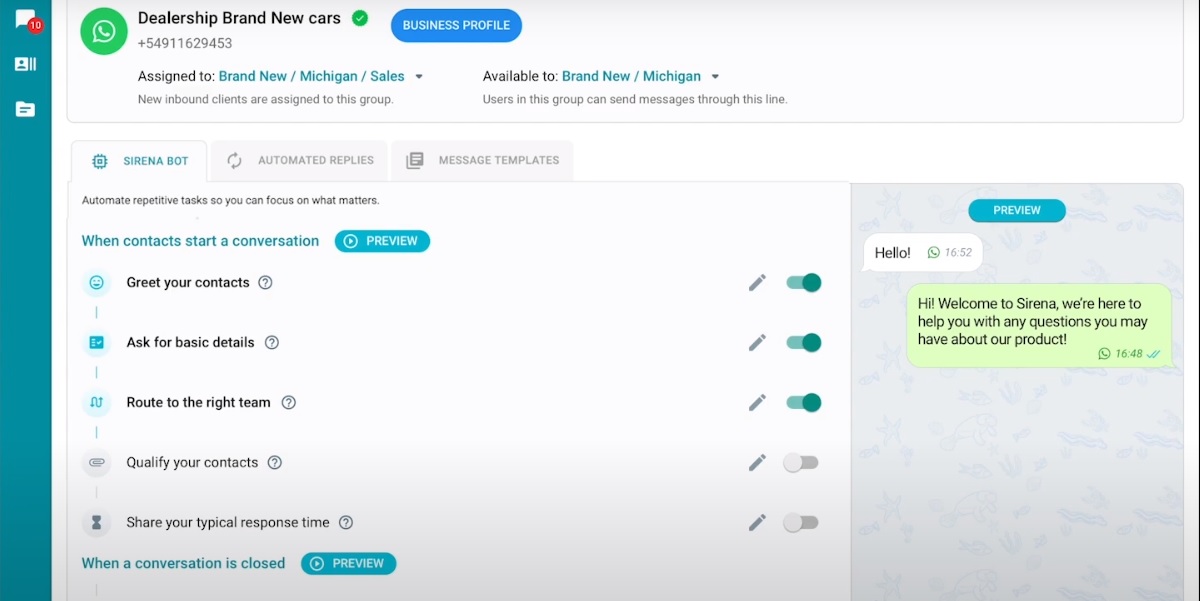
You’ll see a window to configure the greeting message that your bot will use whenever someone contacts you. It’s important to think carefully about how you want to welcome visitors to your communication channel. The screen shows an example message to guide you. But if you aren’t sure how to speak to your audience, you can see our common chatbot questions article.
Ask for basic information: here you can enable and disable requests for basic information such as name, email, and phone number. This information is useful for building your portfolio of potential clients. At this point you can only choose whether or not to ask for the information. The questions themselves cannot be edited.
At this point you can see the route the bot will follow and you can choose which step will be next after asking for contact information. You can select the option where the person will be automatically directed to a customer service agent, or you can disable this option and choose to have the bot qualify the contact.
If you choose to qualify the contacts, you must configure three key questions for the bot to ask, such as what products they are interested in, order number, the size of the company they work for, or any other piece of information that you consider relevant for generating a conversion for your business.
It’s time to customize the conversation flow in the Route to appropriate team section. You can set up personalized tags so the bot will do one of three options: transfer the contact to a team or agent, archive the conversation, or move to the next option. You can add up to four layers of depth for each menu.
Last step: Test your bot! This is one of the most important steps before you activate your bot to interact with the public. Ensure that the conversation flow feels natural for users, that it isn’t confusing, and, of course, that there aren’t any typos.

 min de leitura